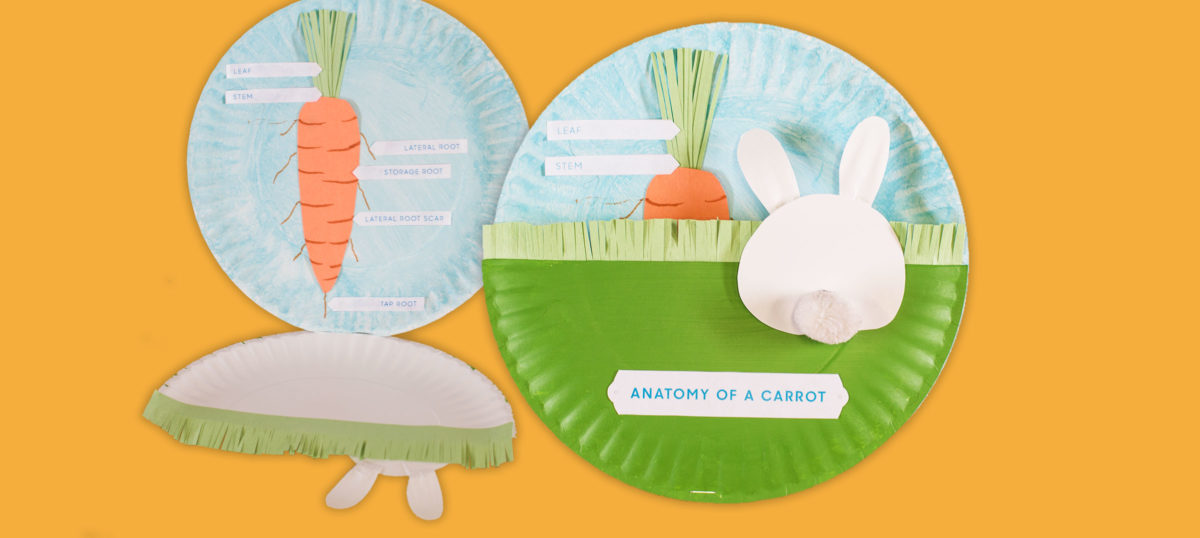
Don’t let Spring pass you by without teaching your students about the anatomy of a carrot in this fun 5-step craft! You probably already have all the ingredients on hand!
STEP 1: Gather your supplies: a copy of the Carrot Anatomy Printable, two paper plates, green construction paper, orange construction paper, green paint, blue paint, a paintbrush, a brown marker, a white puffball/ cotton ball, glue, a pencil, scissors, and a stapler.
STEP 2: Paint one paper plate blue on the inside. Cut the other paper plate in half and paint it green on the outside. Save the unpainted half of paper plate to make the bunny in the next step. Cut out the labels from the provided printable.
STEP 3: On the leftover half of the paper plate, draw a circle that spans from the cut edge to the indented edge. Cut this out to create the body of the bunny. Then cut the ear shapes out of the leftover edge. Glue the ear shapes to the back of the body shape and glue a puffball/ cotton ball to the bottom of the body shape for the tail. Cut a carrot shape from the orange sheet of paper roughly 5 inches tall. Use the brown marker to make the lateral root scars. Cut two 3 inch strips of green construction paper. Then cut slits along the width that are roughly 3/4 the height of the strip. Take a 3-inch section of the green strip and fold it over and over to create the leaves of the carrot. Glue it to the back top edge of the carrot shape.
STEP 4: Take the cut green strip of construction paper and glue it to the back edge of the green half of paper plate. You can cut the “grass” shorter if needed. Glue the carrot to the left side of the blue plate.
STEP 5: Use the brown marker to draw the lateral roots and tap root on the blue plate. Then glue the bunny to the top right of the green plate. Finish your craft by gluing the “anatomy of a carrot” labels to the corresponding part of the carrot, and the title label to the front of the green plate. Staple the two plates together at the bottom edge to create a thing and enjoy your new study tool!
STEP 1: Gather your supplies: a sheet of green, purple, yellow, and orange construction paper, three sheets of white construction paper, two sheets of red construction paper, a glue stick, a paper plate, a white pipe cleaner, clear string, a pencil, and scissors.
STEP 2: To create the raindrops, cut four 3×4 inch squares of construction paper. Fold each in half and glue the right half of one to the left half of another. Continue to do this until all four sheets are glued together. For the umbrella, cut six 9×4 inch strips of red construction paper and fold each in half. Repeat the process of gluing the right half of one sheet to the left half of the next sheet. Continue until all sides are glued.
STEP 3: Fold the glued sheets in half and draw a symmetrical half shape for the umbrella, raindrops, and cloud as shown.
STEP 4: Cut out the shapes and unfold. Cut the white pipe cleaner in half; curl one end to form the handle of the umbrella. Put a little bit of glue on the straight end of the pipe cleaner and insert into the center of the umbrella shape construction paper. Cut six 12 inch sections of clear string and run each piece through the center of each raindrop. Tie a double knot at the bottom of the raindrop and cut off any excess string below the knot.
STEP 5: Cut a 20-inch section of clear string and tie a knot at one end. Run the string through the umbrella. Then tie a double knot roughly 2 inches above the top of the umbrella. Then run the string through the bottom of the raincloud to the top. Tie another double knot roughly 5 inches above the top of the raincloud. Use a pencil to punch a small hole through the center of the paper plate and run the string through this hole. The knot above the raincloud should be under the paper plate. Then create a loop to hang the mobile from and tie securely. Use your pencil to poke six holes evenly distributed along the edge of the paper plate. Take the string attached to each raindrop and run it through these holes. Tie a double knot above the plate and cut any excess string. Now you can enjoy your new “April Showers” mobile!


Comments for Anatomy of a Carrot
Add A Comment
Your email address will not be published. Required fields are marked *