This holiday season, instead of shelling out money for gifts for friends and family, why not give one (or two, or three) of these homemade Christmas gifts a try instead? After seeing the delight in your loved ones’ faces when they unwrap their homemade Christmas gifts, you might find that a gift from the heart (and the hands) is more special than anything that can be purchased from the store. From custom t-shirts to jewelry, we’ve got a homemade gift for everyone on your list this Christmas.
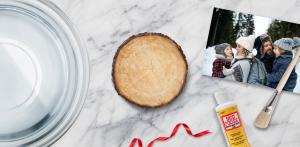
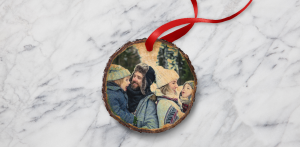
Wood Photo Ornament
Put those sweet family photos to good use as gifts for family members, especially the grandparents who are always requesting updated photos of the grandchildren to display. You can find wood slices at any craft shop. Prefer to gift them for year-round use? Forgo the ribbon and call them coasters—just apply more mod podge to the surface in order to seal it against any water damage.
Materials
- Wood slices
- Photographs printed on photo paper
- Mod Podge
- Foam brush
- Drill and drill bit
- Scissors
- Ribbon
Instructions
- Cut out your photographs to fit each wood slice.
- With the foam brush, apply the Mod Podge to the front of the wood slice.
- Apply the photo circles to the wood slice.
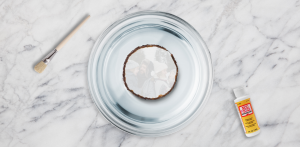
- Apply a second layer of Mod Podge to the photo as a sealant.
- Drill a hole on the top.
- Thread a ribbon through the hole and tie it in a knot at the top.
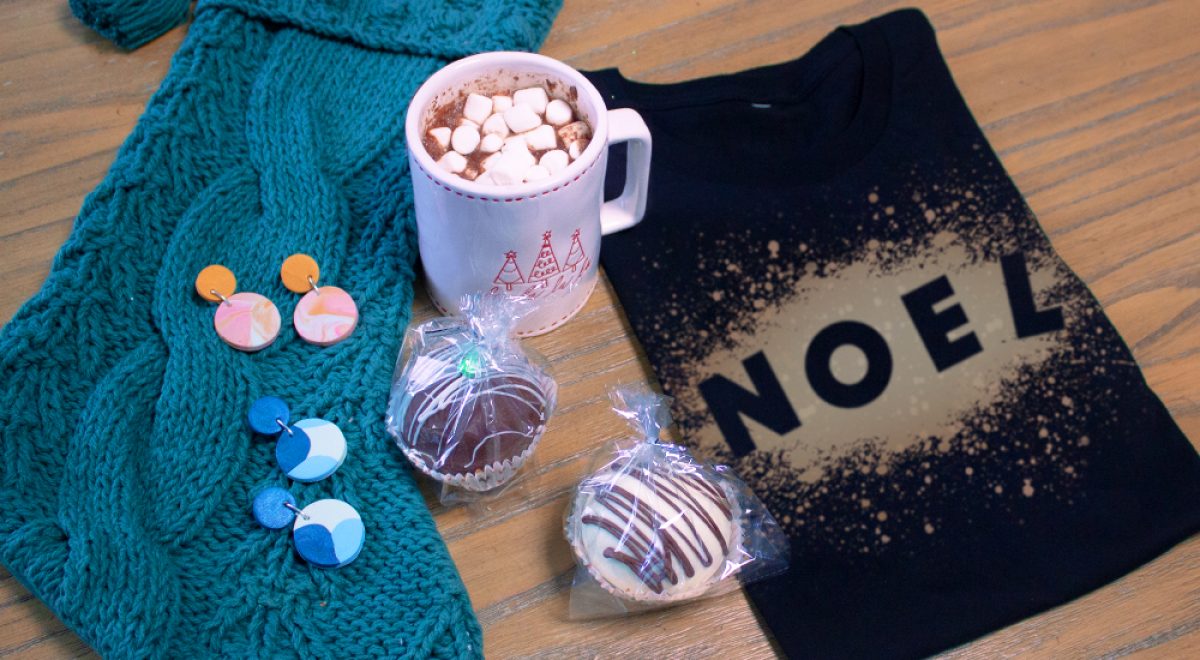
Clay Earrings
What to give to the fashionista on your list who has everything? Whether that’s Grandma, your best friend, or your child’s teacher, she’ll flip over these colorful and unique polymer clay earrings. Older children will love rolling and cutting the clay, and parents may need to step in to attach the wires and earring backs.
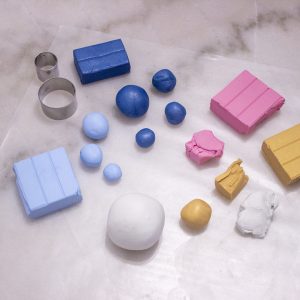
Materials
- polymer clay in different colors
- earring backs
- jump rings
- flexible super glue
- wax paper
- acrylic rolling pin
- round clay cutter set
- flat baking sheet
- toothpick
Instructions
- Soften the clay by kneading it in your hands. Wash your hands (or use baby wipes) in between colors to avoid color mixing.
- Roll a large ball of clay for the background color. Flatten the ball with the acrylic rolling pin into roughly 1/4” thickness.
- Roll several smaller balls of the accent color clays. Lightly flatten these balls and place them sporadically on the background color clay.
- Use the acrylic roller to smooth the accent and background color clays together into a slab of clay roughly ⅛” thick.
- Use the second-smallest round clay cutter to cut two circles out of this slab. Use a toothpick to make holes for the jump rings near the edge of each circle.
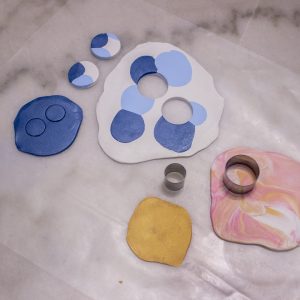
- Roll a small ball of clay using one of the accent colors and flatten to ¼” thickness. Then use the smallest round clay cutter to cut two circles from this slab. Use the toothpick to make holes for the jump rings near the edge of each circle.
- Bake all of the clay circles in the oven according to the packaging instructions. Allow to cool completely before handling.
- Use a jump ring to connect one small, solid-color clay circle to one of the slightly larger multi-colored circles.
- Glue an earring back to the back of the smaller circle near the top of the edge.
- You can reuse the unbaked leftover clay with the background and accent colors for another pair of earrings. Simply roll those scraps into another ball and knead it a few times until you have the desired marble effect. Then repeat steps 5 through 9 to make another pair of earrings!

Coffee Body Scrub
For the beauty lovers on your list, give this coffee body scrub a try. Caffeine has been known to firm skin, and the graininess of the sugar or salt—whichever you choose for this recipe—is a great exfoliator. The quantities can also be doubled or tripled, depending on how many gifts you need.
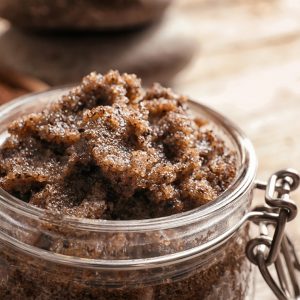
Ingredients
- 1 cup ground coffee (fresh ground coffee beans are best, but leftover coffee grounds will work)
- ½ cup coconut oil
- 1 cup sea salt or granulated sugar
- small, clean glass jars with lids
Instructions
- Simply soften the coconut oil by warming, then mix ingredients together and store in an airtight glass jar.
- Tie ribbons and gift tags around the lid and gift away!
Hot Cocoa Bombs
Last Christmas, hot cocoa bombs were all the rage, and this season is no different. People are still in a frenzy to get their hands on these totally delicious and giftable hot chocolate mixes, so whip some up for the sweet-toothed friends and family on your list!
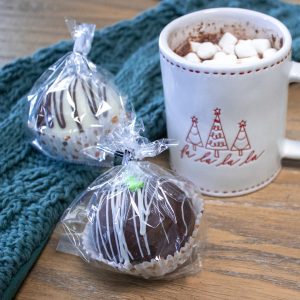
Ingredients
- semi-sweet chocolate chips
- hot cocoa mix
- mini marshmallows
- red and green sprinkles
- round silicone mold
Instructions
- Melt the semi-sweet chocolate chips in a microwave-safe bowl at 50% power in 30-second increments. When the chocolate is nearly melted, keep stirring it to distribute heat. Don’t put it back into the microwave, or it will burn.
- Using a pastry brush or silicone basting brush, brush melted chocolate onto the silicone molds. Don’t worry about it looking pretty, as this is the inside of the ball. Place in the freezer to set, and repeat the process for 3-4 layers. It is better to have the chocolate layers too thick than too thin.
- Fill half of your hot chocolate bombs with powdered hot chocolate mix and marshmallows. Have fun with flavored marshmallows, pieces of candy, and anything else you’d want in your hot chocolate.
- Melt more chocolate. Place it in a candy piping bag or an airtight plastic bag and snip the corner. Pipe chocolate along the edge of a ball, and gently place an empty halve on top. To smooth the seam, you can run your finger around the edge. Allow the seam to set.
- Decorate and garnish however you’d like. Use additional melted chocolate, preferably in a contrasting color, and also more fun sprinkles or decorative balls.
- Place in a cupcake liner and package in a small plastic bag.
- To serve, place one bomb in a mug and pour warmed milk or water over the top!
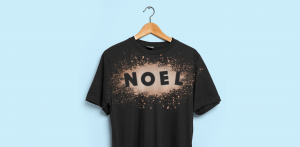
Festive Bleached T-Shirt
Who knew you could make a cute, customized t-shirt with just run-of-the-mill, household bleach? Any kind of stencil will work to create a unique t-shirt for your nephew, neighbor, or entire book club! No stencil? Just cut out some letters from cardstock, or use a pre-purchased laser cut wood sign. Because this is a project involving bleach, make sure there is adult supervision at all times.

Materials
- wood sign, stencil, or cardstock letters
- plain, colored t-shirt (dark colors work better)
- washable adhesive spray or glue stick
- empty spray bottle
- bleach
- water
- large piece of cardboard big enough to fit inside the shirt
- trash bag or plastic tablecloth
Instructions
- Put the cardboard inside the t-shirt to protect the back of the shirt from the bleach. Place the shirt down on a trash bag or plastic tablecloth. As long as it’s not windy, outside is the best place to work.
- Spray the back of the sign, cardstock letters, or stencil with basting spray, or apply the glue stick.
- Place the sign, letters, or stencil sticky side down on the t-shirt and press well so it adheres.
- Test the spray bottle with water to make sure the nozzle is turned to a fine mist. Mix 1 cup water and 1 cup bleach in the bottle and begin spraying it over the sign from the inside out in an even circle. Do not soak the fabric. You want a light spray. Wait 5 minutes.

- As you wait, you will begin to see the spray bleaching the fabric around the sign. After 5 minutes or so, you can spray any areas it seems you have missed, but stick to a light spray and don’t soak it.
- Allow the bleach spray to dry for 20-30 minutes, then gently peel the wood sign off the shirt.
- Immediately soak the shirt entirely in running water, including all the parts that were bleached. Rinse and wring out the shirt three times. Wash and dry it alone on a normal cycle.
Note: Just remember, you’re working with bleach. Find a well-ventilated area, preferably outside, wear gloves, and don’t let small children or pets around this project.
Remember, it’s the thought that counts this Christmas. Your friends and family will love that you and the children took the extra time to make something that will make them smile, year after year.


Comments for Five Fun Homemade Christmas Gifts
Add A Comment
Your email address will not be published. Required fields are marked *